목표: tf od api로 생성한 모델을 jetson에서 tensorrt로 변환
tensorflow에서 TF-TRT를 지원하지만 jetson에서 saved-model 로딩 시간이 상당하고 검색해보니 인퍼런스도 tensorrt만큼 빠르지 않다고 한다. TF-TRT로 생성한 모델을 frozen graph로 저장하면 로딩은 빠르지만 가끔 인퍼런스가 안된다. 아직 이유 못찾음.
▼ 결과: mAP 하락 없이도 tensorrt가 훨씬 빠르고 가볍다.
| 대략 | saved-model | TF-TRT | TensorRT |
| loading | 350 초 | 350 초 | 5 초 |
| inference | 0.11 초 | 0.06 초 | 0.04 초 |
- 환경
- tensorflow 2.4
- tensorRT 7.1.3
요약: ssd_efficientdet 기준
*. Host에서 onnx를 생성하고 jetson에서 tensorrt로 변환하였음.
1. tf 2.x는 saved-model -> onnx -> tensorrt 변환 과정을 거친다.
2. saved-model -> onnx 과정은 tf2onnx(tensorflow-onnx)를 이용한다.
GitHub - onnx/tensorflow-onnx: Convert TensorFlow, Keras and Tflite models to ONNX
Convert TensorFlow, Keras and Tflite models to ONNX - GitHub - onnx/tensorflow-onnx: Convert TensorFlow, Keras and Tflite models to ONNX
github.com
3. onnx를 수정한다. onnx-graphsurgeon을 이용한다.
▼ 코드
import onnx
import onnx_graphsurgeon as gs
import numpy as np


graph = gs.import_onnx(onnx.load('effdet_origin.onnx'))
nodes = graph.nodes
tensors = graph.tensors()

# set input_tensor shape & dtype
input_tensor = tensors['input_tensor']
input_tensor.dtype = np.float32
input_tensor.shape = [1, 512, 512, 3]

# # resize mode
# # 전처리 Loop 노드 내부에 서브 그래프가 존재함. - node.attrs['body']로 접근
# preprocessing_node = nodes[2]
# resize_node = [node for node in preprocessing_node.attrs['body'].nodes if node.op == 'Resize'][0]
# resize_node.attrs['coordinate_transformation_mode'] = 'half_pixel'

# replace preprocessing node
# efficientNet 전처리 과정 구현
scale = gs.Constant(name='scale', values=np.array([1./255.], np.float32).reshape(1,))
input_scaled = gs.Variable(name='input_scaled', dtype=np.float32)
node_scale = gs.Node(op='Mul', inputs=[input_tensor, scale], outputs=[input_scaled])
nodes.append(node_scale)

ch_offset = gs.Constant(name='ch_offset', values=np.array([0.485, 0.456, 0.406], np.float32).reshape(1, 1, 3))
input_ch_shifted = gs.Variable(name='input_ch_shifted', dtype=np.float32)
node_ch_shift = gs.Node(op='Sub', inputs=[input_scaled, ch_offset], outputs=[input_ch_shifted])
nodes.append(node_ch_shift)

ch_scale = gs.Constant(name='ch_scale', values=(1./np.array([0.229, 0.224, 0.225], np.float32)).reshape(1, 1, 3))
input_ch_scaled = gs.Variable(name='input_ch_scaled', dtype=np.float32)
node_ch_scale = gs.Node(op='Mul', inputs=[input_ch_shifted, ch_scale], outputs=[input_ch_scaled])
nodes.append(node_ch_scale)

# onnx의 Conv 노드의 입력은 NCHW 포맷이므로 이미지를 transpose한다.
input_transposed = gs.Variable(name='input_transposed', dtype=np.float32)
node_transpose = gs.Node(
    op='Transpose',
    attrs={'perm': [0, 3, 1, 2]},
    inputs=[input_ch_scaled],
    outputs=[input_transposed],
)
nodes.append(node_transpose)

# Conv 노드의 입력 중 Loop 노드로부터의 입력을 새로운 전처리 노드의 출력으로 대체한다.
conv_node = [n for n in nodes if n.name == 'StatefulPartitionedCall/EfficientDet-D0/model/stem_conv2d/Conv2D'][0]
conv_node.i(0).outputs.clear()
conv_node.inputs[0] = input_transposed

# raw_detection_boxes에 차원 추가
raw_detection_boxes = tensors['raw_detection_boxes']
raw_detection_scores = tensors['raw_detection_scores']

raw_detection_boxes_unsqueezed = gs.Variable('raw_detection_boxes_unsqueezed', dtype=np.float32)
unsqueeze_node = gs.Node(
    op='Unsqueeze',
    name='unsqueeze_raw_detection_boxes',
    attrs={
        'axes': [2]
    },
    inputs=[raw_detection_boxes],
    outputs=[raw_detection_boxes_unsqueezed],
)
graph.nodes.append(unsqueeze_node)

# nms 노드 추가
num_detections = gs.Variable('num_detections', dtype=np.int32, shape=(1, 1))
nmsed_boxes = gs.Variable('nmsed_boxes', dtype=np.float32, shape=(1, 100, 4))
nmsed_scores = gs.Variable('nmsed_scores', dtype=np.float32, shape=(1, 100))
nmsed_classes = gs.Variable('nmsed_classes', dtype=np.float32, shape=(1, 100))

nms_node = gs.Node(
    op='BatchedNMS_TRT',
    name='nms',
    attrs={
        "shareLocation": True, # 같은 박스로 모든 클래스에 대해 nms를 수행
        "numClasses": 6,
        "backgroundLabelId": -1, # 백그라운드 인덱스. 없는 경우 -1로 설정
        "topK": 4096,  # 스코어 순으로 박스를 정렬하여 상위 4096개만 연산
        "keepTopK": 100,  # nms 결과 중 스코어순으로 100개만 취함
        "scoreThreshold": 1e-8,
        "iouThreshold": 0.5,
        "isNormalized": True,  # 박스가 0~1 범위인 경우 True, 픽셀값이면 False
        "clipBoxes": True,  # 박스를 0~1 범위로 clip
        "scoreBits": 10,  # 스코어 비트 수. 높으면 nms 성능이 높은 대신 느려진다.
    },
    inputs=[raw_detection_boxes_unsqueezed, raw_detection_scores],
    outputs=[num_detections, nmsed_boxes, nmsed_scores, nmsed_classes],
)
graph.nodes.append(nms_node)

# 그래프의 아웃풋을 새로 정의
graph.outputs = [num_detections, nmsed_boxes, nmsed_scores, nmsed_classes]
# clearup: 아웃풋에 관여하지 않는 노드를 제거한다.
# toposort: 그래프의 노드들을 순서에 맞게 자동 정렬한다.
graph.cleanup().toposort()
onnx.save_model(gs.export_onnx(graph), 'effdet_modify.onnx')- nms 과정을 tensorrt에서 지원하는 BatchedMNS_TRT / BatchedNMSDynamic_TRT로 교체
- 전처리 과정을 담당하는 Loop노드를 제거하고 직접 전처리 과정을 onnx 노드로 구성
- 입력의 dtype, shape를 명시
4. onnx -> tensorrt
▼ 코드
import tensorrt as trt


# TRT 7.x
print('convert onnx to trt')
TRT_LOGGER = trt.Logger(trt.Logger.WARNING)
trt.init_libnvinfer_plugins(TRT_LOGGER, '')

EXPLICIT_BATCH = 1 << int(trt.NetworkDefinitionCreationFlag.EXPLICIT_BATCH)
with trt.Builder(TRT_LOGGER) as builder, \
        builder.create_network(EXPLICIT_BATCH) as network, \
        trt.OnnxParser(network, TRT_LOGGER) as parser:

    builder.max_workspace_size = (1 << 30)
    builder.fp16_mode = True

    with open('./effdet_origin.onnx', 'rb') as model:
        if not parser.parse(model.read()):
            for error in range(parser.num_errors):
                print (parser.get_error(error))

    engine = builder.build_cuda_engine(network)
    buf = engine.serialize()
    with open('./effdet_origin.trt', 'wb') as f:
        f.write(buf)
과정
■ tf 2.x: saved model -> onnx -> tensorrt
디벨로퍼 가이드를 보니 tf 1.x 에서는 frozen graph -> uff -> tensorrt 변환 과정을 거친다.
tf 2.x 에서는 frozen graph는 지원 안하므로 saved model을 frozen graph로 변환해서 uff converter에 넣어보니 변환이 안된다.
▼ tf 2.x 는 saved model -> onnx -> tensorrt 과정을 거쳐야한다.
Jetson NX optimize tensorflow model using TensorRT
I am trying to speed up the segmentation model(unet-mobilenet-512x512). I converted my tensorflow model to tensorRT with FP16 precision mode. And the speed is lower than I expected. Before the
stackoverflow.com
■ saved model -> onnx: tensorflow-onnx
먼저 학습시킨 efficientDet saved-model을 onnx로 변환시키기위해 tensorflow-onnx를 이용한다.
▼ tf2onnx
GitHub - onnx/tensorflow-onnx: Convert TensorFlow, Keras and Tflite models to ONNX
Convert TensorFlow, Keras and Tflite models to ONNX - GitHub - onnx/tensorflow-onnx: Convert TensorFlow, Keras and Tflite models to ONNX
github.com
python -m tf2onnx.convert --saved-model model/effdet_512x512/saved_model/ --output effdet_origin.onnx --opset 11
onnxruntime을 통해 inference해보니 잘 작동된다.
■ onnx -> tensorrt
▼ onnx-tensorrt 변환 코드 정리
Pytorch와 TensorRT를 이용한 딥 러닝 추론 최적화
이 글은 이전 글에서 계속되는 글입니다. 1. Pytorch Model 먼저 추론하기 위한 모델을 Pytorch를 이용하여 구성합니다. 앞 글에서 설명하였듯이 Bert 를 이용합니다. Bert 를 밑바닥부터 구성하긴 어려우
blog.si-analytics.ai
코드를 정리해놓으신 분이 계셔서 참고
공식 샘플을 보려면 nvidia에서 tensorrt를 tar로 받아 sample/python 참고.
import tensorrt as trt


# TRT 7.x
print('convert onnx to trt')
TRT_LOGGER = trt.Logger(trt.Logger.WARNING)
trt.init_libnvinfer_plugins(TRT_LOGGER, '')

EXPLICIT_BATCH = 1 << int(trt.NetworkDefinitionCreationFlag.EXPLICIT_BATCH)
with trt.Builder(TRT_LOGGER) as builder, \
        builder.create_network(EXPLICIT_BATCH) as network, \
        trt.OnnxParser(network, TRT_LOGGER) as parser:

    builder.max_workspace_size = (1 << 30)
    builder.fp16_mode = True

    with open('./effdet_origin.onnx', 'rb') as model:
        if not parser.parse(model.read()):
            for error in range(parser.num_errors):
                print (parser.get_error(error))

    engine = builder.build_cuda_engine(network)
    buf = engine.serialize()
    with open('./effdet_origin.trt', 'wb') as f:
        f.write(buf)
에러가 발생한다.
■ onnx 수정
tensorflow-onnx로 변환한 onnx를 바로 tensorrt로 변환해보니 에러 발생.
tensorrt로 변환하기 위해서 tensorrt에서 지원하지 않는 부분들을 tensorrt에서 지원하는 방식으로 교체해야한다.
onnx-graphsurgeon 패키지 튜토리얼과 onnx 오퍼레이터를 먼저 훑어보자.
▼ onnx-graphsurgeon example
GitHub - NVIDIA/TensorRT: TensorRT is a C++ library for high performance inference on NVIDIA GPUs and deep learning accelerators
TensorRT is a C++ library for high performance inference on NVIDIA GPUs and deep learning accelerators. - GitHub - NVIDIA/TensorRT: TensorRT is a C++ library for high performance inference on NVIDI...
github.com
▼ onnx-graphsurgeon api
ONNX GraphSurgeon — ONNX GraphSurgeon 0.3.9 documentation
© Copyright 2020, NVIDIA.
docs.nvidia.com
▼ onnx operators
GitHub - onnx/onnx: Open standard for machine learning interoperability
Open standard for machine learning interoperability - GitHub - onnx/onnx: Open standard for machine learning interoperability
github.com
netron을 통해 그래프를 시각화하고, 파이썬을 통해 직접 onnx 구조를 확인하면서 어디를 수정해야할지 정해야한다.
● ONNX 수정 코드
import onnx
import onnx_graphsurgeon as gs
import numpy as np


graph = gs.import_onnx(onnx.load('effdet_origin.onnx'))
nodes = graph.nodes
tensors = graph.tensors()

# set input_tensor shape & dtype
input_tensor = tensors['input_tensor']
input_tensor.dtype = np.float32
input_tensor.shape = [1, 512, 512, 3]

# # resize mode
# # 전처리 Loop 노드 내부에 서브 그래프가 존재함. - node.attrs['body']로 접근
# preprocessing_node = nodes[2]
# resize_node = [node for node in preprocessing_node.attrs['body'].nodes if node.op == 'Resize'][0]
# resize_node.attrs['coordinate_transformation_mode'] = 'half_pixel'

# replace preprocessing node
# efficientNet 전처리 과정 구현
scale = gs.Constant(name='scale', values=np.array([1./255.], np.float32).reshape(1,))
input_scaled = gs.Variable(name='input_scaled', dtype=np.float32)
node_scale = gs.Node(op='Mul', inputs=[input_tensor, scale], outputs=[input_scaled])
nodes.append(node_scale)

ch_offset = gs.Constant(name='ch_offset', values=np.array([0.485, 0.456, 0.406], np.float32).reshape(1, 1, 3))
input_ch_shifted = gs.Variable(name='input_ch_shifted', dtype=np.float32)
node_ch_shift = gs.Node(op='Sub', inputs=[input_scaled, ch_offset], outputs=[input_ch_shifted])
nodes.append(node_ch_shift)

ch_scale = gs.Constant(name='ch_scale', values=(1./np.array([0.229, 0.224, 0.225], np.float32)).reshape(1, 1, 3))
input_ch_scaled = gs.Variable(name='input_ch_scaled', dtype=np.float32)
node_ch_scale = gs.Node(op='Mul', inputs=[input_ch_shifted, ch_scale], outputs=[input_ch_scaled])
nodes.append(node_ch_scale)

# onnx의 Conv 노드의 입력은 NCHW 포맷이므로 이미지를 transpose한다.
input_transposed = gs.Variable(name='input_transposed', dtype=np.float32)
node_transpose = gs.Node(
    op='Transpose',
    attrs={'perm': [0, 3, 1, 2]},
    inputs=[input_ch_scaled],
    outputs=[input_transposed],
)
nodes.append(node_transpose)

# Conv 노드의 입력 중 Loop 노드로부터의 입력을 새로운 전처리 노드의 출력으로 대체한다.
conv_node = [n for n in nodes if n.name == 'StatefulPartitionedCall/EfficientDet-D0/model/stem_conv2d/Conv2D'][0]
conv_node.i(0).outputs.clear()
conv_node.inputs[0] = input_transposed

# raw_detection_boxes에 차원 추가
raw_detection_boxes = tensors['raw_detection_boxes']
raw_detection_scores = tensors['raw_detection_scores']

raw_detection_boxes_unsqueezed = gs.Variable('raw_detection_boxes_unsqueezed', dtype=np.float32)
unsqueeze_node = gs.Node(
    op='Unsqueeze',
    name='unsqueeze_raw_detection_boxes',
    attrs={
        'axes': [2]
    },
    inputs=[raw_detection_boxes],
    outputs=[raw_detection_boxes_unsqueezed],
)
graph.nodes.append(unsqueeze_node)

# nms 노드 추가
num_detections = gs.Variable('num_detections', dtype=np.int32, shape=(1, 1))
nmsed_boxes = gs.Variable('nmsed_boxes', dtype=np.float32, shape=(1, 100, 4))
nmsed_scores = gs.Variable('nmsed_scores', dtype=np.float32, shape=(1, 100))
nmsed_classes = gs.Variable('nmsed_classes', dtype=np.float32, shape=(1, 100))

nms_node = gs.Node(
    op='BatchedNMS_TRT',
    name='nms',
    attrs={
        "shareLocation": True, # 같은 박스로 모든 클래스에 대해 nms를 수행
        "numClasses": 6,
        "backgroundLabelId": -1, # 백그라운드 인덱스. 없는 경우 -1로 설정
        "topK": 4096,  # 스코어 순으로 박스를 정렬하여 상위 4096개만 연산
        "keepTopK": 100,  # nms 결과 중 스코어순으로 100개만 취함
        "scoreThreshold": 1e-8,
        "iouThreshold": 0.5,
        "isNormalized": True,  # 박스가 0~1 범위인 경우 True, 픽셀값이면 False
        "clipBoxes": True,  # 박스를 0~1 범위로 clip
        "scoreBits": 10,  # 스코어 비트 수. 높으면 nms 성능이 높은 대신 느려진다.
    },
    inputs=[raw_detection_boxes_unsqueezed, raw_detection_scores],
    outputs=[num_detections, nmsed_boxes, nmsed_scores, nmsed_classes],
)
graph.nodes.append(nms_node)

# 그래프의 아웃풋을 새로 정의
graph.outputs = [num_detections, nmsed_boxes, nmsed_scores, nmsed_classes]
# clearup: 아웃풋에 관여하지 않는 노드를 제거한다.
# toposort: 그래프의 노드들을 순서에 맞게 자동 정렬한다.
graph.cleanup().toposort()
onnx.save_model(gs.export_onnx(graph), 'effdet_modify.onnx')
● input dtype - float32로 지정
Unsupported ONNX data type: UINT8 (2)
In node -1 (importInput): UNSUPPORTED_NODE: Assertion failed: convertDtype(onnxDtype.elem_type(), &trtDtype)
uint8 입력은 tensorrt에서 지원하지 않는다.
onnx_graphsurgeon 패키지를 이용해 입력 dtype을 float32로 변경한다.
● Resize node - transformationMode 변경
Resize 노드 관련 - 전처리 과정을 담은 Loop 노드를 없애므로 pass
In node 2 (importResize): UNSUPPORTED_NODE: Assertion failed: (transformationMode == "half_pixel" || transformationMode == "pytorch_half_pixel" || transformationMode == "align_corners") && "TensorRT only supports half_pixel, pytorch_half_pixel, and align_corners transofmration modes for linear resizes when sizes are provided!"

전처리 과정으로 생각되는 Loop 노드 내부에 Resize 노드의 mode가 asymmetric로 설정되있는데 tensorrt에서는 half_pixel, pytorch_half_pixel, align_corners 만 지원한다. 일단 half_pixel로 변경.

● NMS 과정을 tensorrt plugin BatchedNMSDynamic_TRT로 교체
[TensorRT] ERROR: INVALID_ARGUMENT: getPluginCreator could not find plugin NonMaxSuppression version 1
In node 935 (importFallbackPluginImporter): UNSUPPORTED_NODE: Assertion failed: creator && "Plugin not found, are the plugin name, version, and namespace correct?"
onnx의 NMS를 지원하지 않는다.
▼ tensorrt에서 지원하는 BatchedNMS_TRT / BatchedNMSDynamic_TRT 로 nms 노드를 교체해야한다.
How to use NMS with Pytorch model (that was converted to ONNX -> TensorRT) · Issue #795 · NVIDIA/TensorRT
All right, so, I have a PyTorch detector SSD with MobileNet. Since I failed to convert model with NMS in it (to be more precise, I converted it, but TRT engine is built in a wrong way with that .on...
github.com
netron에서 살펴보니 nms 노드가 class 수만큼 있다.tf-od-api의 nms 알고리즘 부분을 살펴보면
batch의 이미지별로
- boxes: (batch_size, num_boxes, 1, 4)
- scores: (batch_size, num_boxes, num_classes)
- 각각의 클래스 스코어(batch_size, num_boxes)로 nms수행 = 동일한 박스로 스코어만 달리하여 class의 수만큼 nms를 수행한다.
- 모든 class의 nms결과를 모아 스코어 순으로 내림차순 정렬하여 max_total_size만큼만 가져간다.
▼ tf-od-api NMS method
GitHub - tensorflow/models: Models and examples built with TensorFlow
Models and examples built with TensorFlow. Contribute to tensorflow/models development by creating an account on GitHub.
github.com
tensorrt의 BatchedNMS_TRT도 동일하게 작동한다.
▼ BatchedNMS_TRT
GitHub - NVIDIA/TensorRT: TensorRT is a C++ library for high performance inference on NVIDIA GPUs and deep learning accelerators
TensorRT is a C++ library for high performance inference on NVIDIA GPUs and deep learning accelerators. - GitHub - NVIDIA/TensorRT: TensorRT is a C++ library for high performance inference on NVIDI...
github.com

그런데 BatchedNMS_TRT는 하나의 노드이고tf-od-api의 nms과정을 모두 펼쳐져있어서 개별 nms 노드를 BatchedNMS_TRT로 바꾸는건 적절하지 않고 전체 nms 과정을 통째로 BatchedNMS_TRT로 교체하는게 깔끔할 것 같다.
tf-od-api의 nms를 수행하는 부분을 살펴보면 raw_detection_boxes에 차원을 추가하고, raw_detection_scores는 그대로 nms 함수에 넘겨주는데 BatchedNMS_TRT도 동일한 쉐이프로 입력을 받는다.
▼ tf-od-api NMS input
GitHub - tensorflow/models: Models and examples built with TensorFlow
Models and examples built with TensorFlow. Contribute to tensorflow/models development by creating an account on GitHub.
github.com
그러면 BatchedNMS_TRT 노드를 생성하고 raw_detection_boxes와 raw_detection_scores를 넣어주면 되겠다.먼저 raw_detection_boxes에 차원을 추가하고 BatchedNMS_TRT를 생성하여 차원이 추가된 raw_detection_boxes와 raw_detection_scores를 입력으로 넣어준다.

● input shape 지정
[TensorRT] ERROR: Network has dynamic or shape inputs, but no optimization profile has been defined.
다이나믹 쉐이프 입력을 받으려면 뭔가 설정이 필요한가보다. 나는 고정된 쉐이프를 사용하니 입력의 쉐이프를 지정한다.
● Loop node 내부의 Gather node
[TensorRT] ERROR: ../builder/myelin/codeGenerator.cpp (114) - Myelin Error in addNodeToMyelinGraph: 0 (map/while/TensorArrayV2Read/TensorListGetItem operation not supported within a loop body.)

그래프에 Loop가 하나 있는데 전처리 과정으로 생각되는 노드다. 그 안에 TensorListGetItem 이름의 Gather 노드가 존재하는데 tensorrt에서는 루프 내부에 gather를 허용하지 않는다.
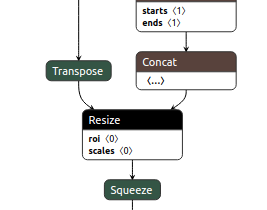
netron에서 Loop 노드의 아웃풋을 검색해보면 총 3개의 출력이 나오는데 nms 부분을 수정한 후에는 다음 Conv노드로 들어가는 출력 외에는 사용되지 않는다.
Loop 노드 자체를 없애고 전처리 과정을 구현해서 붙여준다.
efficientNet의 전처리 과정을 참고한다.
▼ efficientNet 전처리
GitHub - tensorflow/models: Models and examples built with TensorFlow
Models and examples built with TensorFlow. Contribute to tensorflow/models development by creating an account on GitHub.
github.com

변환 성공!
'개발공부' 카테고리의 다른 글
| SSD - anchor 생성시에 sqrt(aspect_ratios)? (0) | 2021.08.25 |
|---|---|
| tensorflow 2.x object detection api & snpe ] dlc 변환 (0) | 2021.08.20 |